How to Validate Complex Web Forms Using Code Effects
This is the first article in our new How To series, focused on real-life uses of the Code Effects decision automation platform. Each article will take a practical business or development problem and walk through how Code Effects can be used to solve it, with implementation details, code examples, and working demo projects where applicable.
More How To articles are coming soon...
The Problem
You have a complex web form - an insurance claim, a loan application, a vendor registration - that internal or public users of your web app must fill out and submit to your server. Your server has to validate each submission against complex, hard-coded business logic that changes often, usually at the request of product owners or business analysts.
The Current Solution
Your team usually employs one of two common ways of evaluating complex business logic:
Your IT team maintains a separate business layer, or a separate internal .NET library, that declares the entire validation logic. It takes a C# source class that represents the web form and uses a series of if/else clauses, switch statements, recursive calls, and custom error handling to validate it against the business logic of the web form. There are two major problems with this approach:
- The business logic is part of your code base. That means your team must re-test and re-deploy the project every time a part of the validation logic changes.
- The business team does not fully own the business logic of that form - your development team must be heavily involved in each and every change.
Your team develops and maintains custom evaluation code for this web form using a collection of database tables, spreadsheets, config files, and so on. This approach works, especially if the validation logic doesn't change that often. But it also has two major problems:
- Same as above: your business team does not fully own the business logic - they still need developers to introduce each and every change.
- The developer who created this evaluation code takes most of that knowledge with them when they leave the company. It's custom code built for a very specific business need, so there's usually little or no documentation, and new hires spend a lot of time and resources trying to deploy logic updates, sometimes inadvertently causing serious business issues.
The Proposed Solution
Move the entire evaluation logic to a free or cost-effective business rules engine that lets product owners author and manage the business logic used by the company's systems and services, and evaluate it against web form submissions, without involving IT beyond the initial setup.
One of the benefits of this approach is that it can stay as simple as described in this article, or go well beyond a single web form validation if needed. As the company grows, the same decision engine can just as easily power an intelligent analysis of all the data the company receives from various sources - risk management and estimation, fraud detection, handling of malicious attempts, logging of everything happening across the company's infrastructure for later analysis, and even custom or common AI orchestrations.
This article discusses the implementation and use of the Code Effects decision automation platform. You can fork the GitHub repo of the ASP.NET Core demo project discussed here, compile and run it locally to see the web form validation in action. The demo uses the Engine Free edition, so you'll be able to run it without spending anything.
Briefly: What is a Business Rules Engine?
Imagine your company receives a loan application from an external source (in this example, a web form) that your project maps to a local Application C# class and evaluates using the following business logic:
if(application.AnnualIncome > 100000 &&
	CompanyAiEngine.GetCreditScore(application.ID) >= 620)
{
	application.Status = Statuses.Success;
	application.ApprovalDate = GetTodayDate();
	CompanyWorkflow.Approve(application);
	SendNotification(application.Contact.Email, "Your application has been approved");
}
else
{
	CompanyWorkflow.Declyne(application);
	SendNotification(contact.Email, "Your application has been denied");
}
This setup has all the usual problems of hard-coded business logic listed above. Your team can transform it into a BA-friendly system by letting your business users type the same validation logic into a simple web-based UI as an easy-to-understand, language-like rule:
if
	Annual Income is greater than 100000 and
	Credit Score(Application ID) is greater or equal to 620
		then
			set Status to Success and
			set Approval Date to Today and
			Approve and
			Notify Applicant (Email, "Your application has been approved")

else
			Declyne and
			Notify Applicant (Email, "Your application has been denied")
Your system saves this rule as a simple XML string in a database or a text file. Product owners can use the same web-based UI to load it later for any updates. When your system receives the Application object again, it only needs to load that rule (or a series of rules as a ruleset) and evaluate it against that object:
var ruleXml = CompanyRuleStorage.GetRule(ruleID);
var evaluator = new Evaluator<Application>(ruleXml);
var success = evaluator.Evaluate(application);
Note that all your data surfaces, mappings, services, and methods used throughout your code base - like GetCreditScore, SendNotification, CompanyWorkflow, and CompanyAiEngine in the example above - stay the same. Your business team can now define and manage the business logic they own without your involvement whatsoever.
This, in a nutshell, is what the Code Effects business rules engine is and how it operates.
Implementation
Code Effects consists of two major components: the free web-based rule editor that helps create and manage rules in any web app, including React, Angular, and ASP.NET Core, and the execution engine that can execute those rules in any .NET code.
Real-life systems usually manage rules in one system and execute them in another. For simplicity, our demo app does both using the same /wwwroot/index.html page, which hosts the rule editor on top and the form below it. The form is a user registration application, generated dynamically by /Services/API.cs using the public fields of /Models/User.cs.
/Services/API.cs declares endpoints that generate the web form and the initial settings for the editor. It also loads, saves, and deletes rules using the temporary RuleStorage dictionary, and evaluates the rule currently displayed in the editor against the User data from the web form.
The /wwwroot/index.html page declares two <div> containers for the editor and the form. It also declares the page's main script, which initializes the editor and defines the functions that handle rule loading, saving, deletion, and evaluation on the client side.
Note that Code Effects supports two types of rules: evaluation and execution. Use the Rules menu in the Toolbar to select either type - this demo project works with both out of the box.
To test this, compile and run the demo project, create a new rule in the editor, fill out the form with data that makes at least some sense in relation to the rule you just created, and click the Evaluate button. The "info" <div> will display the output of the evaluation. This demo uses the Engine Free edition, which holds the evaluation of any rule for 5 seconds - keep that in mind.
Here are the implementation steps in detail:
Step 1: The References
Create a new ASP.NET Core web application, or use an existing one.
Reference the CodeEffects.Rule.Engine and CodeEffects.Rule.Editor assemblies from NuGet. This also references CodeEffects.Rule.Common - the dependency that declares functionality and types common to both components.
Install the latest version of the codeeffects npm package. The editor needs the main JavaScript and styles from that package. The demo project automatically copies them from their package location to the /wwwroot folder when you build the project. These files are referenced in the header of the index.html page:
<link rel="stylesheet" href="/codeeffects.common.css" />
<link rel="stylesheet" href="/codeeffects.light.css" />
<script type="module" src="codeeffects.editor.js"></script>
Notice the type="module" attribute of the <script> tag. The npm package provides a modularized codeeffects.editor.js file that can be used in client frameworks and plain web apps alike. It should therefore be added as a module to plain HTML documents. Code Effects also provides React and Angular demo repos on GitHub if you'd rather implement the platform using those frameworks.
Add two div containers to the <body> of index.html, for the rule editor and the form:
<div id="divEditor"></div>
<div id="divForm"></div>
At this point, the Code Effects platform is installed. Let's add two more containers: one for the info messages, and one for the Evaluate button that will trigger the form evaluation process.
<div id="divInfo">Create a rule, fill out the form with test values, and click Evaluate</div>
<div><input type="button" id="btnEvaluate" value="Evaluate"/></div>
Next, we need to wire it all up.
Step 2: The Source Object
The data to be evaluated against your rules (let's call it data) may come to your project in many shapes and formats from all kinds of sources. But eventually, any decision engine requires a type the data can be mapped to. Such a type is often called Facts, Data Model, or Evaluation Context. Code Effects calls it a Source Object; our platform supports either declared .NET classes, dynamic sources, and meta descriptions that can be mapped to the source object, or deserialized into it, at evaluation time.
Depending on your business needs, you may declare many source objects and build rules for any number of them. To keep things simple, the demo project uses only one - the /Models/User.cs class:
using CodeEffects.Rule.Common.Attributes;

namespace CodeEffects.Demo.Asp.Models;

public class User
{
	[Field(DisplayName = "ID", Min = 0, Settable = false, IncludeInCalculations = false, AllowCalculations = false)]
	public int? Id { get; set; }

	[Field(DisplayName = "First Name", Max = 200, Filter = "name")]
	public string? FirstName { get; set; }

	[Field(DisplayName = "Last Name", Max = 200, Filter = "name")]
	public string? LastName { get; set; }

	[Field(DisplayName = "Date of Birth", DateTimeFormat = "MMM dd, yyyy")]
	public DateTime? Dob { get; set; }

	public Gender Gender { get; set; } = Gender.Undefined;

	[Field(DisplayName = "Total Savings", Min = 0, Max = 10000000)]
	public decimal? Savings { get; set; }

	[Field(DisplayName = "Total Debt", Min = 0, Max = 10000000)]
	public decimal? Debt { get; set; }

	[Field(DisplayName = "Mobile", Max = 12, Filter = "phone")]
	public string? CellPhone { get; set; }

	[Field(DisplayName = "Home Phone", Max = 12, Filter = "phone")]
	public string? HomePhone { get; set; }

	[Field(DisplayName = "Work Phone", Max = 12, Filter = "phone")]
	public string? WorkPhone { get; set; }

	[Field(DisplayName = "Home Email", Max = 300, Filter = "email")]
	public string? HomeEmail { get; set; }

	[Field(DisplayName = "Work Email", Max = 300, Filter = "email")]
	public string? WorkEmail { get; set; }

	[Field(DisplayName = "Admin")]
	public bool? IsAdmin { get; set; }

	[Field(DisplayName = "Home Address")]
	public Address Home { get; set; } = new Address();

	[Field(DisplayName = "Work Address")]
	public Address Work { get; set; } = new Address();

	[ExcludeFromEvaluation]
	public string? Output { get; set; }

	[Method(DisplayName = "Full Name")]
	public string FullName()
	{
		return $"{LastName ?? "--"}, {FirstName ?? "--"}";
	}

	public void Log(string message)
	{
		this.Output += $"{message} ";
	}

	[Action(DisplayName = "Send SMS")]
	public void Sms([Parameter(Filter = "phone")] string phone, string message)
	{
		// Send implementation goes here
		this.Output += $"SMS sent: {message} ";
	}

	[Action(DisplayName = "Send Email")]
	public void Email([Parameter(Filter = "email")] string email, string message)
	{
		// Send implementation goes here
		this.Output += $"Emailed: {message} ";
	}

}

public enum Gender
{
	Undefined = 0,
	Male = 1,
	Female = 2
}

public class Address
{
	[Parent("Home", "Home Street")]
	[Parent("Work", "Work Street")]
	[Field(Max = 200, Filter = "street")]
	public string? Street { get; set; }

	[Parent("Home", "Home City")]
	[Parent("Work", "Work City")]
	[Field(Max = 200, Filter = "city")]
	public string? City { get; set; }

	[Parent("Home", "Home Zip")]
	[Parent("Work", "Work Zip")]
	[Field(Max = 5, Filter = "postal")]
	public string? Postal { get; set; }

	[Parent("Home", "Home State")]
	[Parent("Work", "Work State")]
	public States State { get; set; } = States.Undefined;
}
public enum States
{
	Undefined = 0,

	Arizona = 1,
	California = 2,
	Georgia = 3,

	[EnumItem("North Carolina")]
	NorthCarolina = 4,
	[EnumItem("South Carolina")]
	SouthCarolina = 5,
	[EnumItem("South Dacota")]
	SouthDacota = 6
}
Notice the heavy use of the Field, Method, Action, and other attributes declared in the CodeEffects.Rule.Common.Attributes namespace. They can be used to customize pretty much any important aspect of rule authoring. You can also use those attributes as guardrails, making sure users can't insert rule elements in places where they'd be invalid or irrelevant. Our platform is known for its "If you saved it, it's valid" approach to rule design, which doesn't require additional human validation after a rule is created and saved.
Step 3: The API
Besides the rule management functionality initiated on the client by the rule author and managed on the server, the rule editor needs the server to generate metadata for the source object's field menus, generate the form's HTML from the source object's fields, and provide the UI settings to instantiate itself on the client. The demo's /Services/Api.cs class uses Minimal APIs to provide the /api/settings endpoint for that:
using System.Collections.Concurrent;
using CodeEffects.Demo.Asp.Models;
using CodeEffects.Rule.Common.Models;
using CodeEffects.Rule.Editor;
using CodeEffects.Rule.Editor.Models;
using CodeEffects.Rule.Engine;
using CodeEffects.Toolkit;

namespace CodeEffects.Demo.Asp.Services;

public static class Api
{
	// Simple in-memory rule storage for the sake of this demo
	private static readonly ConcurrentDictionary<string, Models.Rule> RuleStorage = new();

	public static void MapEndpoints(this WebApplication app)
	{
		// Returns client settings for the editor
		// and HTML string of the web form
		app.MapGet("/api/settings", () =>
		{
			var settings = new Settings();

			// Get an instance of the editor
			var editor = GetControl();

			// Generate UI settings for the editor
			settings.GlobalData = editor.GetGlobalData();

			// Generate the source-related settings for the editor
			settings.EditorData = editor.GetEditorData();

			// Generate html labels and input controls for the web form
			// using Code Effects Toolkit
			settings.FormHtml = Html.GenerateForm(editor.SourceType);

			return Results.Ok(settings);
		});
	}

	private static Control GetControl()
	{
		// Use the ID of the div element that contains the editor
		var editor = new Control("divEditor");

		// Set the editor to use the User class as its source object
		editor.SourceType = typeof(User);
		editor.EvaluationMode = EvaluationMode.Execution;

		return editor;
	}
}

public class Settings
{
	public string? GlobalData { get; set; }
	public string? EditorData { get; set; }
	public string? FormHtml { get; set; }
}
A couple of important things are going on in this code example:
- The
RuleStorage dictionary is a stand-in for rule storage. It's a demo, hence the simplicity - in a real-life application you'd likely store your rules in a database or file system. The platform doesn't enforce a vendor-defined rule storage, giving you the freedom to store your business logic using your own environment, data access, and security context.
- The
/api/settings endpoint instantiates the editor and settings, then generates the UI and source settings for the editor. It also uses the Code Effects Toolkit to dynamically generate the form's HTML for all public fields of the User class. Our Toolkit is an open-source .NET library that takes any .NET class and generates HTML <input> and <select> controls for each public field. It can also populate the generated form with a class instance's values - we'll use that functionality later in this article, when we submit our form for evaluation.
Step 4: The Client
The /wwwroot/index.html page declares the main script that drives all client-side functionality of the demo project. Here's the code that initializes the editor and the form:
// Declare editor as a global variable
var editor = null;

// Initializes and renders
// the editor and the form
async function settings()
{
	const res = await fetch(
		'/api/settings',
		{headers: {'Accept': 'application/json'}});

	const settings = await res.json();

	// Init the editor
	editor = $rule.init(settings.globalData);

	// Set the rule management callbacks
	editor.setCallbacks(load, remove, save);

	// Load the source data into the editor
	editor.loadSettings(settings.editorData);

	// Render the User form
	document.getElementById("divForm").innerHTML = settings.formHtml;

	// Evaluate the rule currently displayed in the rule area
	// when the user clicks the Evaluate button
	document.getElementById("btnEvaluate").onclick = function (e) { evaluate(); };
};

// Get everything going on page load
settings();
The script fetches the Settings object from the /api/settings endpoint on the page's load event. The editor supports two types of client initialization: client centric and server centric. This demo uses server-centric initialization, which does the following:
- Calls
init(..) via the $rule global shortcut to get an instance of the editor.
- Sets the callback functions the editor invokes when the rule author wants to save, load, or delete a rule (not shown here for simplicity).
- Loads the source settings.
- Assigns the HTML of the form generated by the Code Effects Toolkit on the server to its
<div> container, rendering the entire web form on the page.
- Subscribes to the click event of the
Evaluate button using a handler that calls evaluate() (shown below).
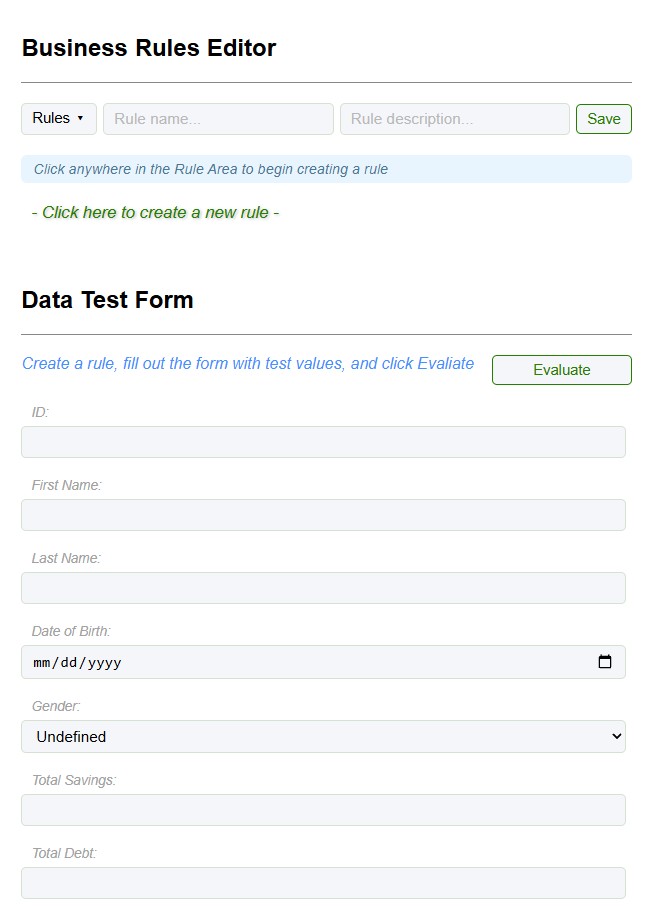
If you run the demo project at this point, you'll get a UI that renders the editor on top and the form representing the User class below it (the demo uses styles and HTML elements omitted here for clarity; this screenshot only shows about half of the actual form):
Step 5: The Evaluation
To evaluate this form against any rule displayed in the rule area, we need two things:
An endpoint on the server that uses the Evaluator class to execute the rule against the data, set any values, and invoke any action methods required by the rule, then return the evaluation result.
/Services/Api.cs declares the /api/evaluate endpoint, which uses the Control class to take care of all the internal plumbing of rule evaluation:
  app.MapPost("/api/evaluate", (Request req) =>
  {
  	var editor = GetControl();
  	// Load the rule into the editor
  	editor.LoadRuleData(req.Rule);

  	var response = new Response();

  	if(editor.IsEmpty)
  	{
  		// There was no rule in the request
  		response.IsRuleEmpty = true;
  		response.Output = "The rule is empty";
  	}
  	else if(!editor.IsValid)
  	{
  		// The submitted rule is invalid
  		response.IsRuleValid = false;
  		// Get invalid rule elements
  		response.ClientInvalidData = editor.GetInvalidData();
  	}
  	else
  	{
  		// Get XML strng of the submitted rule
  		var ruleXml = editor.GetRuleXml();
  		// Create an instance of the Evaluator using the User class.
  		// This compiles your rule into IL
  		var ev = new Evaluator<User>(ruleXml);
  		// Evaluate the rule against the instance of the User class
  		// from the web form submitted by the user
  		bool success = ev.Evaluate(req.Source); // The Source is the User
  		// Output the evaluation result reusig
  		// the just evaluated instance of the User
  		response.Output = success ?
  			$"The rule evaluated to TRUE {req.Source.Output}" :
  			$"The rule evaluated to FALSE {req.Source.Output}";
  		// Re-generate the form controls, this
  		// time using the instance of the User
  		response.FormHtml = Html.GenerateForm(req.Source);
  	}

  	return Results.Ok(response);
  });

  public class Request
  {
  	public string? Rule {  get; set; }
  	public User Source { get; set; } = new User();
  }

  public class Response
  {
  	public bool IsRuleEmpty { get; set; } = false;
  	public bool IsRuleValid { get; set; } = true;

  	public string? Output { get; set; }
  	public string? ClientInvalidData { get; set; }
  	public string? FormHtml { get; set; }
  }
The endpoint creates an instance of the Control class and loads the rule. It then checks whether the rule is empty or invalid. The client side has built-in functionality that notifies the rule author of an invalid rule:
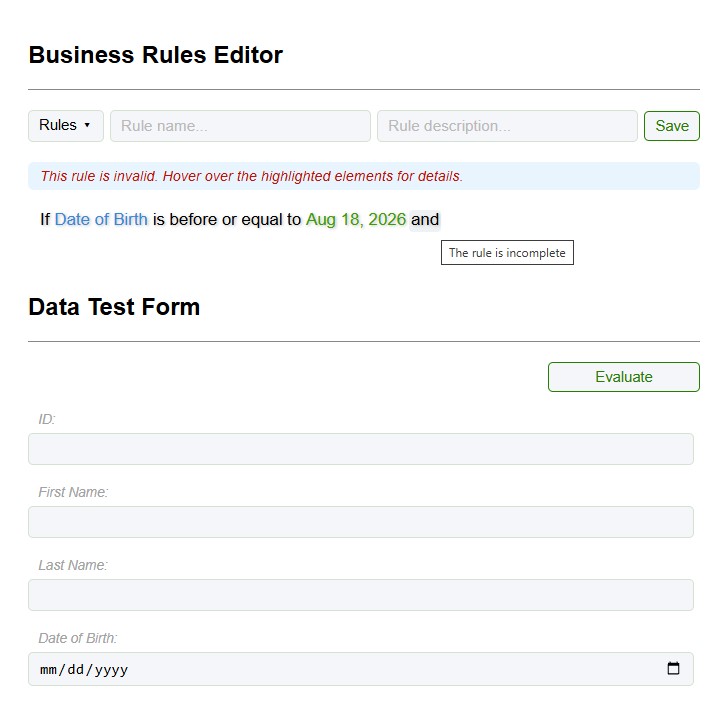
It then gets the XML string of the rule, creates an instance of the Evaluator class using User as its source object, and evaluates the rule against the submitted User instance.
Lastly, it regenerates the form, sets Response.Output, and returns the result. We need to regenerate the form using the User instance because it was just evaluated, and the engine may have updated its fields or invoked rule actions that changed the submitted values.
A method on the client that extracts the current rule from the editor, collects the User data from the form, and submits both to the server. We invoke evaluate() from the onclick handler of Evaluate button declared earlier.
  async function evaluate()
  {
  	// Generate a new instance of the User class and fill it with data
  	// from the form to be evaluated against the currently displayed rule
  	const data = serializeForm(document.getElementById("divForm"));
  	// Post the rule and the form data to the /api/evaluate endpoint
  	const ev = await fetch('/api/evaluate', {
  		method: 'POST',
  		headers: { 'Content-Type': 'application/json' },
  		body: JSON.stringify({ rule: editor.extract(), source: data })
  	});

  	const res = await ev.json();

  	if (res.isRuleEmpty)
  	{
  		info("The rule is empty");
  	}
  	else if (!res.isRuleValid)
  	{
  		// Load the invalid rule elements into the editor
  		editor.loadInvalids(res.clientInvalidData);
  		info(" ");
  	}
  	else
  	{
  		// Reload the test form (values could be updated by the rule)
  		document.getElementById("divForm").innerHTML = res.formHtml;
  		// Display the evaluation output
  		info(res.output);
  	}
  };

  // Extracts user data from the form
  function serializeForm(container)
  {
  	const obj = {};

  	container.querySelectorAll("input, select").forEach(el =>
  	{
  		let value;

  		if (el.type === "checkbox") value = el.checked;
  		else if (el.tagName === "SELECT" || el.type === "number") value = el.value.trim() === '' ? null : Number(el.value);
  		else value = nullOrValue(el);

  		setNestedValue(obj, el.name, value);
  	});

  	return obj;
  }

  // Handles reference types
  function setNestedValue(obj, path, value)
  {
  	const parts = path.split(".");
  	let current = obj;

  	for (let i = 0; i < parts.length - 1; i++)
  	{
  		const key = parts[i];

  		if (!(key in current) || typeof current[key] !== "object" || current[key] === null)
  			current[key] = {};

  		current = current[key];
  	}

  	current[parts[parts.length - 1]] = value;
  }

  function nullOrValue(input)
  {
  	var v = input.value.trim();
  	return v.length > 0 ? v : null;
  };

  function info(message)
  {
  	document.getElementById("divInfo").innerHTML = message;
  };
The interesting point here is the serializeForm function that generates an instance of the User object by selecting all <input> and <select> controls and their values.
To test all this, create a simple rule, type values for the ID, Total Debt, and Total Savings fields in the form as shown in the screenshot below, and click the Evaluate button:
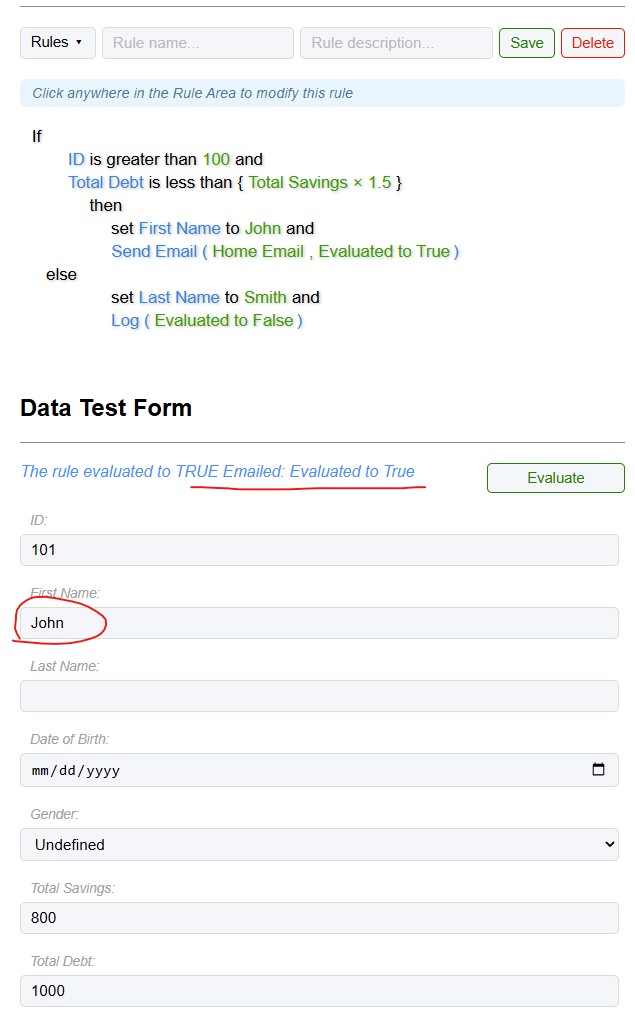
Remember that all rule action methods of the User source object write to the User.Output property, which the evaluate endpoint uses to set Response.Output. That's the value the page renders as the info message - it is added functionality for this demo and has nothing to do with the engine or the editor itself.
Summary
Moving form validation out of hard-coded C# and into a rules engine your business team can manage on its own does more than save you a few re-deploys down the line. It hands ownership of the logic back to the people who actually understand the business, while your development team keeps full control of the data surfaces, mappings, and action methods those rules call into.
The demo project covered in this article walks through the whole flow end to end: a source object your rules can be built against, an editor that renders itself and the form from that object, and an evaluator that executes whatever rules your business team has saved. Clone the repo, run it locally, and start experimenting with your own source objects and rules - the provided Engine Free edition is more than enough to see everything described here in action.
And if your validation needs eventually grow past a single form, the same setup scales into broader decision automation - risk scoring, fraud detection, or anything else your business logic needs to cover - without changing how your development team works with it.
Also published on Dev.to, Medium, HashnodeDate: August 08, 2026