Using Rule Editor
Rule Editor is the free web-based tool that helps rule authors to create new business rules and load existing ones for modification, validation, or deletion. It consists of two components: the JavaScript class codeeffects.editor.js, which implements the editor’s client-side functionality, and the .NET assembly CodeEffects.Rule.Editor.dll, which implements its server-side logic. The CodeEffects.Rule.Editor.Control.cs class declared in that assembly defines the server-side functionality of the editor. See the implementation article for details on obtaining and implementing the editor in your project.
You can implement the editor in any new or existing .NET web application in a matter of hours with minimal effort. The main purpose of this tool is to provide web-based CRUD operations for interacting with business rules. It does not include additional rule-management functionality such as versioning, user access, or storage, leaving you free to implement these based on your own business needs and policies.
The editor also does not perform rule loading, saving, or deletion on its own. Instead, it signals your application about the user’s intent, giving you full control over how to handle those actions.
For example, when a user clicks the Save button, the editor invokes your Save(..) callback and passes the ID and XML of the current rule, effectively notifying your code:
“The user wants to save the currently displayed rule. This is its ID and XML. Handle it according to your logic.”
UI Elements
Rule Editor consists of three main elements:
Toolbar — An optional UI element at the top of the editor that helps manage rules. It’s included for convenience and is ideal for testing the Code Effects platform or for smaller production projects. You can use it as is or hide it and implement its functionality yourself. The Toolbar is enabled by default. Set Control.ShowToolBar to false to hide it. See its own documentation topic for details.
Help String — An optional line of text between the Toolbar and the Rule Area that guides rule authors as they create or modify rules and warns about issues or errors. It’s enabled by default and uses the English culture. Set Control.ShowHelpString to false to hide it. Use the Help XML feature to control the culture and language of static UI labels and messages.
Rule Area — The panel at the bottom of the editor that contains all elements of the rule being authored.
Users can author rules using both keyboard and mouse gestures. Cut, copy, and paste of rule elements are also supported.
Rule Editor can operate in five modes that define the evaluation types of your rules. It’s important to understand what these modes are and how they work.
Usage
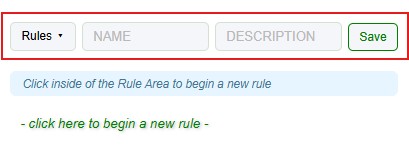
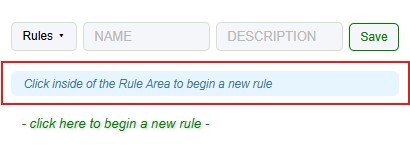
When you first load a page containing the Rule Editor, the Rule Area is empty and shows a default instructional message. To begin a new rule, click inside of an empty Rule Area and select the first field from the context menu. If enabled, the Help String provides context-sensitive instructions as you proceed.
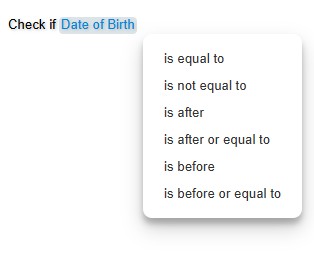
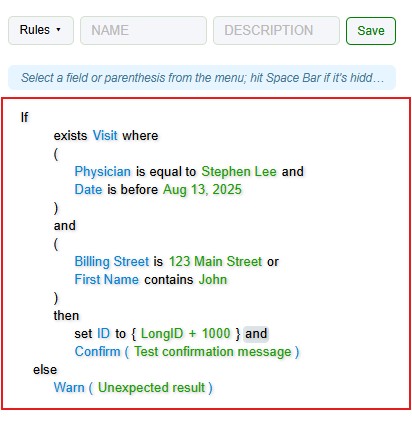
The editor lets you build rules of any complexity without predefined controls or rigid formats. To create a new rule, click inside the Rule Area and start selecting from the available menu options — the editor dynamically displays valid choices based on your previous selections. The Help String (if visible) provides hints on what to select next. Name the rule using the Name textbox in the Toolbox (if visible) and click Save to notify your application that the rule is ready to be stored.
To edit an existing rule, select its name from the Rules menu (assuming the Toolbar is visible and you loaded available rules into the menu). Update any rule element by clicking it and selecting the replacement field, value, or other options suggested by the editor. When finished, rename the rule if necessary, optionally add a description, and click Save to persist changes and notify your application that the rule should be updated in storage. Click Delete to indicate that the currently displayed rule needs to be removed. (The Delete button appears only when an existing rule is loaded.)
Parentheses
One of the most popular Code Effects UI features is the intuitive use of parentheses to control the order of evaluation. Many traditional systems require manually combining conditions into large rulesets and specifying evaluation order or priority for each condition. Code Effects eliminates that complexity: parentheses work exactly as authors expect:
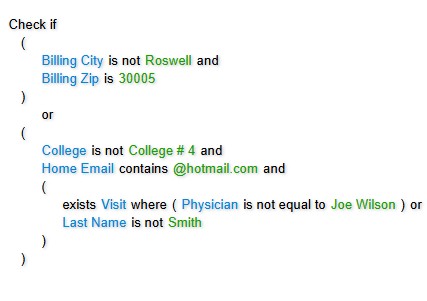
The opening parenthesis appears as the first item in relevant context menus, and the editor automatically determines where the closing parenthesis can go.
The built-in validation (described below) enforces consistent use of AND/OR logical operators within a single rule level (a level is a group of conditions combined by the same logical operator). In simple terms, you cannot mix different logical operators at the same rule level. Examples:
- NO:
Check if ( A is B and C is not D or E is less than F )
- YES:
Check if ( A is B and C is not D and E is less than F )
- YES:
Check if ( A is B or C is not D or E is less than F )
Nesting is also supported:
- YES:
Check if ( A is B and ( C is not D or E is less than F ))
Collections
Rule Editor includes full support for .NET collections, including passing collections as parameters to in-rule methods and rule actions. If the source object declares a public collection, the Rule Area adds Exists... and Does not exist... options in field menus. Selecting one of these options switches the Rule Area into collection-authoring mode. See the collections data type topic for details on how to work with them.
Numeric Calculations
In Code Effects, rules can declare numeric calculations involving numeric fields and values. By default, all numeric fields can be compared to the result of a calculation unless this feature is explicitly disabled by setting FieldAttribute.IncludeInCalculations to false.
Select a numeric field from the fields menu and choose Add a calculation.... The editor will wrap the calculation in curly brackets and allow you to build expressions using parentheses, mathematical operators, input values, and numeric fields. You can exclude a numeric field from calculations (for example, User ID fields) by setting its FieldAttribute.IncludeInCalculations property to false.

Automatic Rule Validation
Rule Editor performs automatic validation every time a rule is saved or updated, including circular dependency checks. Always verify Control.IsValid before saving or updating a rule.
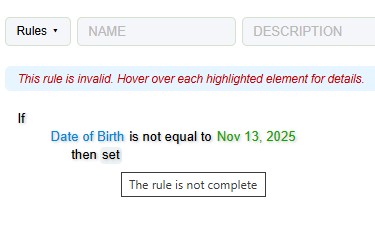
If a rule is invalid, the Help String displays a warning, and the editor highlights each invalid element. Authors can hover over any highlighted element to see a description of the issue.
using CodeEffects.Rule.Editor;
using CodeEffects.Rule.Engine;

// The "rule" parameter is the JSON string returned
// by the $rule.extract() client method
public (string output, string invalids) Evaluate(string rule)
{
	var editor = GetEditor(); // Create the editor
	editor.LoadClientData(rule); // Load the rule into the editor

	if(editor.IsEmpty)
	{
		return ("The rule is empty", default);
	}
	else if(!editor.IsValid)
	{
		// Return the output and JSON string containing invalid elements
		return("The rule is invalid", editor.GetClientInvalidData());
	}
	else
	{
		// Using an anonymous object as a source for this example.
		// This works for demonstration purposes but is impractical in production.

		var data = new { ID = 0, Name = "Test" };

		var evaluator = new Evaluator(data.GetType(), editor.GetRuleXml(), null);
		bool success = evaluator.Evaluate(data);

		return (success ? "The rule evaluated to TRUE" : "The rule evaluated to FALSE", default);
	}
}

private Control GetEditor()
{
	// Using the same anonymous object here as in the
	// Evaluate method for the sake of completeness

	var type = new { ID = 0, Name = "Test" };
	var editor = new Control("divEditorClientContainerID");

	editor.SourceType = data.GetType();
	editor.ShowHelpString = true;
	editor.ShowToolBar = true;

	return editor;
}